Cursor Configuration Guide: Quick Setup

This guide will walk you through the process of integrating Cursor with APIpie to leverage the power of multiple AI models and enhance your AI coding experience.
Free Tier Cursor Users
If you are on the Free Tier with Cursor and are running into the "Model XXX Does not work with your current plan or API key" issue then follow our Cursor Free Tier Workaround Guide
What is Cursor?
Cursor is an AI-powered code editor that revolutionizes the way developers write, edit, and understand code. Built on the foundation of Visual Studio Code, Cursor integrates advanced AI capabilities directly into your coding workflow, offering intelligent code completion, natural language code generation, and contextual assistance that understands your entire codebase.
Steps
1. Create an APIpie Account
- Link: Register here
- Follow the link and fill out the form to create your account.
2. Add Credit
- Link: Add Credit
- Access the subscription section after logging in to add credits to your account.
3. Generate an API Key
- Link: Generate API Key
- Navigate to the API keys section and create a new key. This key is necessary for API requests.
4. Download and Install Cursor
- Visit the official Cursor website
- Download the appropriate version for your operating system (Windows, macOS, or Linux)
- Install Cursor following the standard installation process for your platform
5. Configure APIpie in Cursor Settings
- Open Cursor and navigate to Settings (Cursor > Settings > Cursor Settings)
- Go to the "Models" section in the settings sidebar
- Configure the following APIpie integration:
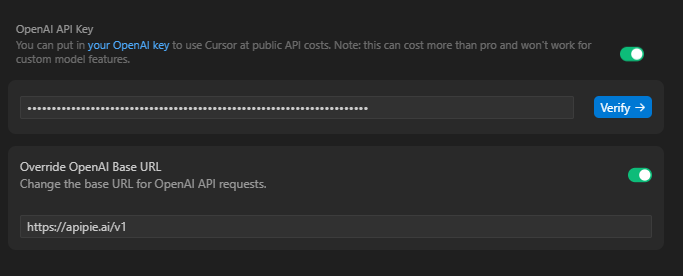
Basic Configuration
- Scroll down to the "OpenAI API Key" section
- Toggle the switch to enable the OpenAI API Key functionality
- Click on "Override OpenAI Base URL" and enter:
https://apipie.ai/v1 - Input your APIpie API key from step 3
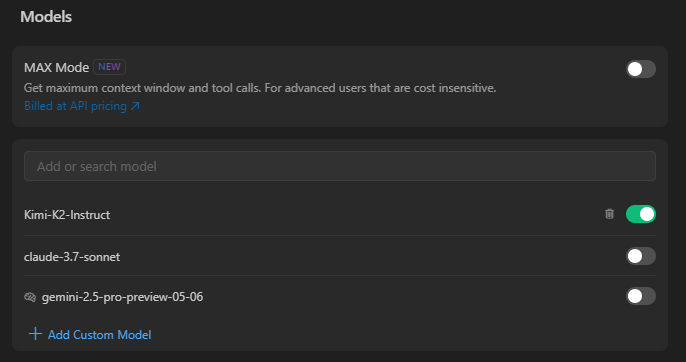
Model Configuration
- Disable all models
- Click the Verify button to check your configuration
- Add APIpie models by clicking "+ Add model" and entering model identifiers (e.g.,
claude-3-5-sonnet-20241022,gpt-4o)
Troubleshooting
- You must disable any model not provided by your custom endpoint - APIpie
6. Start Coding with Cursor and APIpie
- With the integration complete, you can now enjoy enhanced AI-powered coding assistance using Cursor with APIpie models
- Start typing code and experience intelligent completions powered by APIpie's diverse model selection
Tips for Best Results
- Ensure you have sufficient credits in your APIpie account for uninterrupted coding assistance
- Disable other API providers in Cursor to avoid conflicts with APIpie integration
Testing Your Integration
- Test Tab Autocomplete: Start typing a function and see intelligent completions appear
- Try Agent Mode: Press Ctrl+I and ask to create a new function or refactor existing code
- Use Inline Edit: Select code, press Ctrl+K, and describe changes you want to make
- Chat Interface: Open the chat panel and ask questions about your codebase
Additional Resources
- Cursor Website: Learn more about Cursor's features and capabilities. Visit the website
- Cursor Documentation: Comprehensive guides and tutorials for using Cursor. Access the docs
- Cursor Community: Connect with other Cursor users and get support. Join the community
- APIpie Observability Dashboard: Monitor your API usage and manage your account. Visit Observability
Additional Support
If you encounter any issues during the integration process, please reach out to us on Discord for assistance.